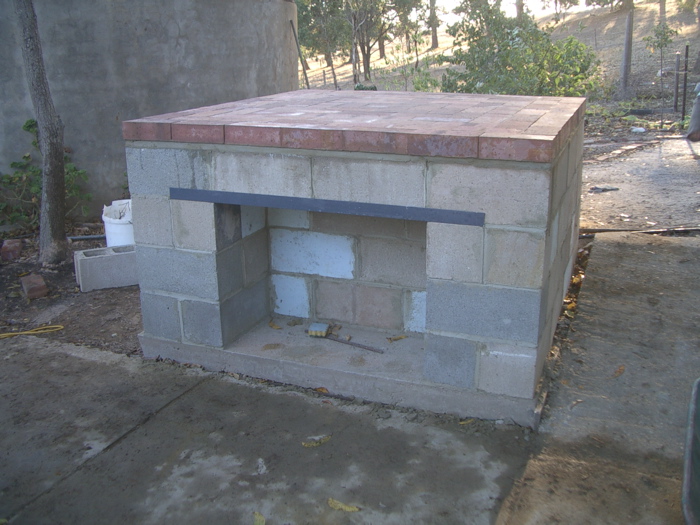
I built the floor of my brick oven out of red clay bricks.
The bricks I used for the dome were much older (c1940s), and in my opinion hold
heat more effectively than the new brick pavers I used for the floor (I guess they
don’t make them like they used to).
Many people opt for firebricks (or refractory bricks) for
the oven floor. Firebricks are designed for kilns, furnaces, ovens etc, and can
withstand extremely high temperatures, far hotter than you’d even want your
pizza oven. They probably hold heat better than the new clay bricks, however,
so in that regard make a great option, if you can find and afford them.
But I reckon the old clay bricks do just as well. Just make sure they’re flat
and smooth (a flat even surface is desirable for cooking on).
 Basically, I lay the bricks for the floor much as you’d lay
pavers. I had to fiddle around to find what kind of pattern would work best. I
scribed some diagonals across the top of the base to find the very centre, and
used that as a starting point.
Basically, I lay the bricks for the floor much as you’d lay
pavers. I had to fiddle around to find what kind of pattern would work best. I
scribed some diagonals across the top of the base to find the very centre, and
used that as a starting point.
As luck would have it, I’d made the base just
the right size (and square enough) so that the standard size clay bricks covered the top perfectly
(only the final few bricks needed a slight trim with my angle grinder).
 I set the bricks on a bed of sand and cement (4
parts sand to 1 part cement). The reason for using a mixture of sand and cement
was that I planned to hose the whole thing down when done – allowing moisture
to permeate the gaps between the bricks, combine with the sand-cement
and then harden, binding the whole thing together.
I set the bricks on a bed of sand and cement (4
parts sand to 1 part cement). The reason for using a mixture of sand and cement
was that I planned to hose the whole thing down when done – allowing moisture
to permeate the gaps between the bricks, combine with the sand-cement
and then harden, binding the whole thing together.
Using some level lengths of timber as a guide, I screed the sand-cement mix
to form an even bed around 30mm deep, and lay the bricks directly on top,
tamping them down firmly with a rubber mallet.
I worked slowly and carefully,
checking the layout frequently to ensure it was both square and level.

The outermost two courses of bricks were to sit on top of
the bessa block foundation walls. As the bessa blocks are open at the top,
unless I filled them in with extra sand and rubble, I couldn't lay an even bed
of sand for the floor bricks to sit on.
As such, I decided to mortar the
outermost bricks in place, securing them firmly to the top of the bessa blocks
and holding the rest of the floor snugly in place.


To finish, I swept more of my sand-cement mixture over the top with a stiff broom. I kept this up, working the sand into all the tiny gaps between the bricks, until they wouldn’t take any more.

Then I hosed the
floor down lightly, cleaned the tops of the bricks with a damp sponge, and that
was it.
Next step - the dome!
NICE BLOG!!! Your blog is very informative. Thanks for sharing a nice information.
ReplyDeleteConcrete Blocks Price | Red clay Bricks
"I set the bricks on a bed of sand and cement (4 parts sand to 1 part cement). The reason for using a mixture of sand and cement was that I planned to hose the whole thing down when done – allowing moisture to permeate the gaps between the bricks, combine with the sand-cement and then harden, binding the whole thing together."
ReplyDeleteCan you please explain this how to mortar the floor bricks.