Some brick ovens are encased in a virtual cube of solid material, to help keep in all the lovely heat, enabling one to use the oven for cooking many hours after the fire has died down.
 Not having money enough for that much material, and wanting to preserve the attractive dome design, I opted for a more modest but (as it turned out) highly effective approach.
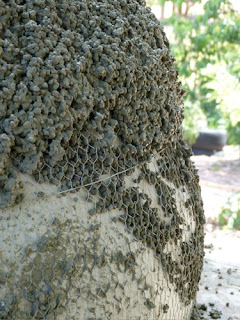
To begin with I covered the brick dome with a layer of 'rock wool' (ceramic insulation), fixed taut over the dome with a layer of chicken wire mesh.
I rang around a few insulation places and managed to find a roll of rock wool that wasn't too expensive and that was large enough to cover the dome entirely.
NB. If you're wondering how much insulation you'll need, here's a handy formula for calculating the surface area of a dome:
Surface Area = 2πRH (where R is the radius and H is the hight of the dome)
As you can see from the pictures, it took a bit of cutting and arranging to get the flat sheet of insulation to sit happily over the curved surface of the dome. I used a pair of garden shears to cut the rock wool, and short lengths of wire to stitch the edges together. Likewise, the chicken wire (acquired readily and cheaply from the local tip or recycling centre) needed a bit of encouragement to sit snug over the layer of insulation. I managed to fold and poke the various loose ends of the wire mesh into the nooks and crannies at the base of the dome and around the chimney to get it to sit tight.
The point of the chicken wire is to help support the next insulating layer - a concrete render made just like normal concrete but with the aggregate/stones replaced with perlite.
Perlite is a synthetic lightweight and porous stone used for hydroponic gardening. I picked up a bag quite cheaply from a hydroponics supplier. The perlite tends to soak up a lot of the moisture in the concrete mix, so I had to compensate with a little extra water and cement.
Even then, it was a bit stubborn and fiddly to work with. In the end I just put on a pair of gardening gloves and slapped hand-fulls of the stuff all over the mesh, pressing it firmly into place.

In essence, those two layers (the rock wool and the perlite render) make up core insulation for the oven. The old house bricks themselves retain heat very well, and so with just this additional 2 inches of quality insulation, I was confident the oven would retain plenty of heat.
All that was needed now was a finishing layer of cement render (see Insulation - Part II)


No comments:
Post a Comment